Pantry Shelf Organization: What Goes on Which Shelf
The logic of shelf placement in three directions: everyday food between waist and eye level, heavy items low and light ones high, tallest at the back, one category per row, plus a table of what suits each shelf band.
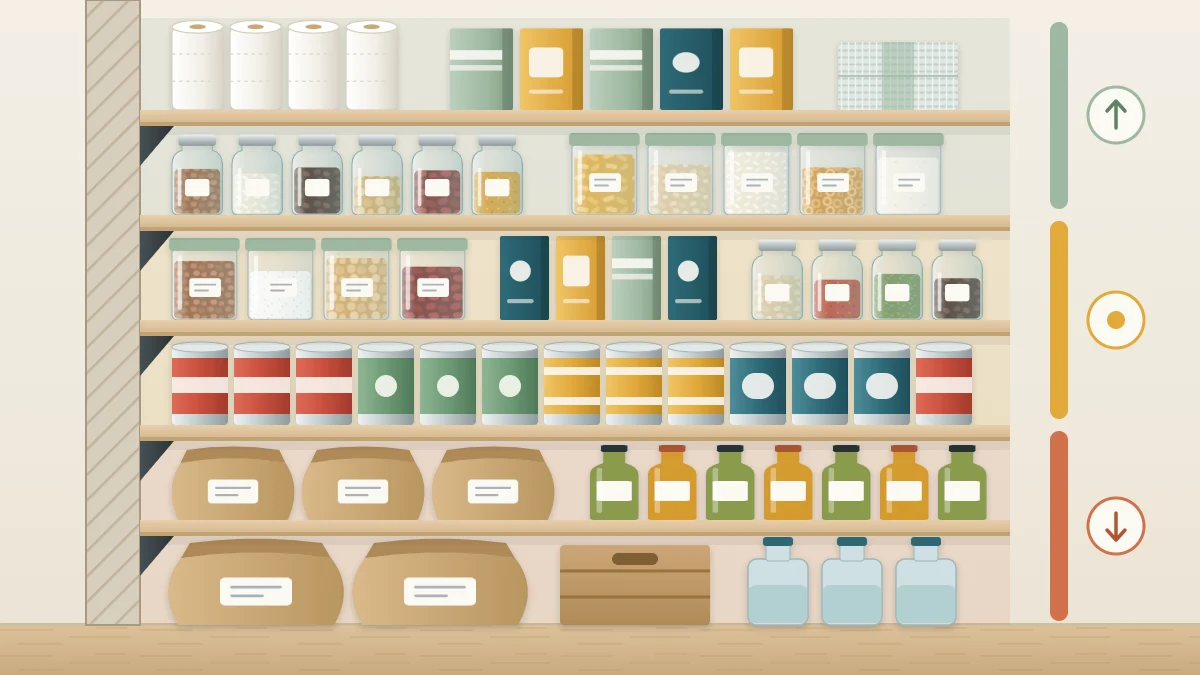
Good pantry shelf organization answers one question: given the shelves you have, what goes on which one? The answer is less about taste than about your body. Some shelves are easy to see and reach, some need a stretch and some need a bend, and food should be placed with that in mind.
The logic works in three directions: top to bottom, front to back and left to right. Once you understand all three, you can place almost any item without a rulebook, and other people in the house can guess where it lives.
Top to bottom: divide the pantry by reach
Stand in front of your pantry and notice which shelves you can see into and reach without effort. That is the prime band, running from about waist height to eye level. It is the most valuable space you have, and it should hold the food you use every day or nearly every day.
Above eye level, you can reach the front edge of a shelf but cannot see what sits on it. This band suits things that are light and rarely needed, or backstock, meaning unopened spares of items already in use. Light matters, because anything stored high has to be lifted down over your head.
Below the waist, and on the floor, you can see the tops of things but must bend to fetch them. This band suits heavy and bulky items: bulk bags, drinks, large bottles and, if they live in the pantry, small appliances. Low is the sensible place for weight, both for the shelves and for your back.
The bands shift with the person, so set the prime band by whoever uses the pantry most.
Shelf bands at a glance
| Shelf band | What suits it | What to avoid there |
|---|---|---|
| Above eye level | Light, rarely used items; light backstock; paper goods; seasonal supplies in a bin with a handle | Heavy jars, cans and bottles; glass; small loose items that vanish from view |
| Waist to eye level | Everyday food: breakfast items, snacks, grains and pasta, cooking staples, seasonings | Backstock, occasional ingredients and anything used only a few times a year |
| Below the waist | Canned goods, baking staples such as flour and sugar, heavier jars, children’s snacks | Small items in single rows, which are hard to tell apart when viewed from above |
| Floor | Bulk bags, cases of drinks and heavy spares, gathered in a crate or bin | Loose piles, open packages and anything in thin paper or cardboard sitting directly on the floor |
Front to back: tallest behind, shortest in front
Within a shelf, depth is where food gets lost. Two habits prevent most of it.
First, step the heights. Put the tallest items at the back and the shortest at the front, so each row shows over the one before it. Tall bottles behind medium jars behind short cans gives you three visible rows.
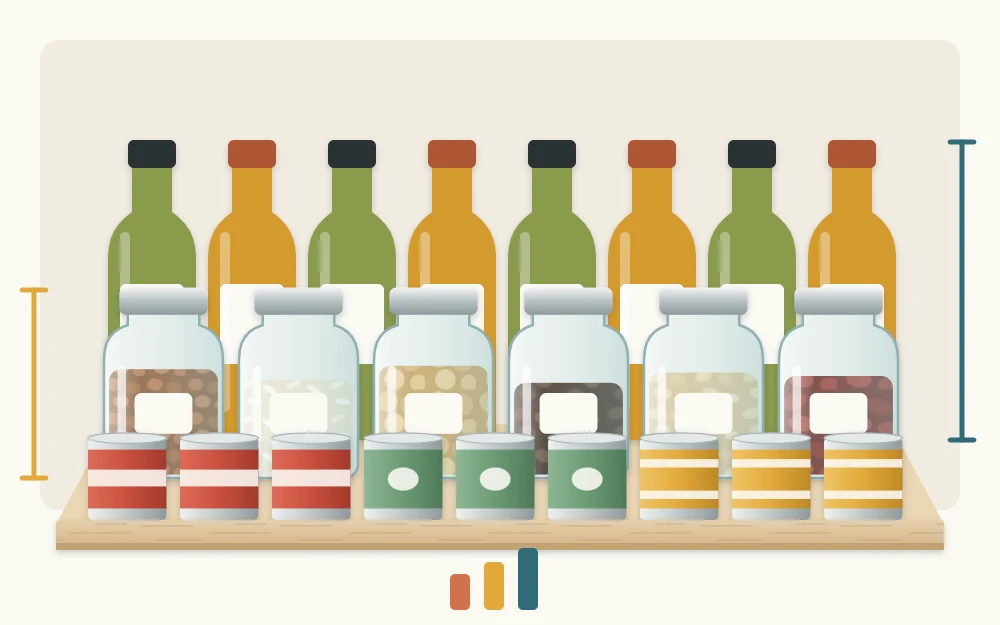
Second, keep one category per row, running front to back. If the front item is a can of chickpeas, everything behind it should be chickpeas, or at least canned beans. Then the front item works as a label for the whole row, and you never need to move one kind of food to check what is behind it. Put the older package in front so it is used first.
What you want to avoid is the mixed stack, where each item hides the next. There is more on this principle in the guide to pantry visibility.
Left to right: pick an order and keep it
Side-to-side order matters less than the other two directions, but a consistent one saves small amounts of time every day. There are two reasonable approaches.
- Follow the order you cook in. For example, oils and seasonings nearest the door because they come out first, then grains and pasta, then canned goods and sauces.
- Keep it simply consistent. Put related zones side by side, such as breakfast next to snacks or baking next to grains, and use the same order on every shelf where it applies.
If one side of the pantry is easier to reach, give that side to the items used most often.
Leave a little empty space on each shelf
A shelf filled to its edges looks efficient and behaves badly. Nothing can be put back without moving something else, and the next grocery trip has nowhere to land.
As a starting point, aim to leave a visible gap on every shelf, roughly the width of one more row. If you cannot, the shelf is holding too much, and some of it probably belongs with the spares on a higher or lower shelf.
Tip
Test a shelf by taking out the item at the very back and putting it away again with one hand. If you had to move more than one thing, the shelf is too full or the rows are mixed.
Adjustable shelves: fit the shelf to the food
If your shelves sit on pegs, clips or tracks, their spacing is a choice, not a given. Look for wasted air: a tall gap above a row of short cans is space you are paying for and not using.
Group items of similar height on the same shelf, then move the shelf above down to leave just enough clearance to lift things out. Measure the tallest item on each shelf before moving anything.
Good to know
Follow the shelf system’s instructions when repositioning shelves, and stay within its stated load limits. Empty a shelf before moving it, check that every support is fully seated, and keep heavy loads such as cans, jars and bottles on the lower shelves.
With fixed shelves, you can still recover wasted height by adding pieces that sit on or hang from the shelf. The guide to pantry shelf organizers explains which of them solve which problem.
Shelves that need their own approach
The rules above assume a shelf of ordinary depth, where you can reach the back row without trouble. Deep shelves break that assumption: the back is out of sight and out of reach, and stepped rows alone will not rescue it. They need methods that bring the back forward, which are set out in the guide to organizing deep pantry shelves.
Cans are the other special case. They are heavy, nearly identical in shape and easy to lose behind one another, so they reward a dedicated setup. See the guide to organizing canned goods for rows, risers and rotation.
For everything else, the three directions are enough.
Frequently asked questions
What should go on the top shelf of a pantry?
Light things you rarely need: paper goods, spare boxes of cereal, seasonal baking supplies and other light backstock. Gathering them in a bin with a handle lets you bring the whole group down at once. Avoid storing heavy jars, cans, bottles or glass above eye level.
Where should heavy items go in a pantry?
On the lower shelves or the floor. Cans, jars, large bottles and bulk bags are easier to lift from below the waist, and low placement puts less demand on the shelving. Check the stated load limits for your shelf system instead of guessing how much a shelf can take.
How much space should I leave on a pantry shelf?
Enough that you can return an item without moving anything else. A visible gap about the width of one more row is a reasonable starting point. If every shelf is full to the edges, move spares to a higher or lower shelf or reduce how much you store.